RIP is a simple Distance Vector dynamic routing protocol that uses hop counts as its Router Metrics to determine best paths for traffic. It is typically only used in small or test environments, because the maximum hop count is 15, and it will perform Equal Cost Multi Path (ECMP) for up to 4 paths by default.
Note
RIP only supports IPv4 networks; for IPv6 support use RIPng
RIPv2 Configuration
Initial set-up
From the global configuration prompt, simply use the router ip command. Once we are in router configuration mode, we can optionally enter a specific version number.
After that, we simply need to tell the router which network to use for RIP using network <network address>.
R1(config)#router rip
R1(config-router)#version 2
R1(config-router)#network 10.0.0.0
Note
The
networkcommand should reference a classfull network. Not subnet mask is specified (for example, if the IP address of the interface is10.1.1.1/24we still use10.0.0.0).
The network 10.0.0.0 will cause all interfaces on the router that begin with 10 to start advertising and form adjacency to other links. Once established, those links will advertise all of the 10.x networks to that router.
We can see general configuration and verify it using Verification. Additionally, we can use show ip rip database - this is useful to look at when we have neighbours we expect but don’t see in the routing table. It will allow us to determine if perhaps the data was not received, or if there is perhaps a different route.
Auto-summary
RIP will default to summarizing routes in classfull boundaries:
| Host address | Advertised adress |
|---|---|
192.168.10.1/30 | 192.168.10.0/24 |
172.16.10.1/30 | 172.16.0.0/16 |
This can be turned off from the router config prompt with no auto-summary. |
Warning
Modern networks are not commonly designed around classful boundaries, and as a result having RIP auto summary enabled is almost never desired.
Manual summarization
Whenever we manually set summary routes in RIP the individual routes are not advertised - only their summary route. This gives us control of how exactly we summarize and allows us to transcend classfull boundaries.
To summarize we begin in config-router mode select a specific interface (for instance, interface f1/0). We then declare an ip summary-address, using a specific protocol, and then the network and mask:
R1(config-router)#interface f1/0
R1(config-if)#ip summary-address rip 10.0.0.0 255.255.0.0
Note
The summary-address is configured on the interface that is doing the advertising.
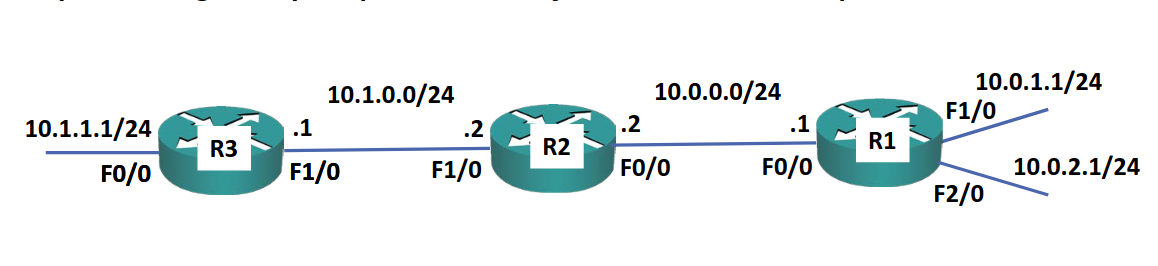
Assuming the above configuration, we advertise the 10.0.0.0/16 summary route out the left side of R1 - summarized to cover all the routes to the right. Note that R3 will only learn the summary - it simply knows that access to 10.0.0.0/24 is via R2.
Note
The downside of using manual sumarization is that the router will only see the next hop - thus if there are more hops via one interface, we may lose that information.
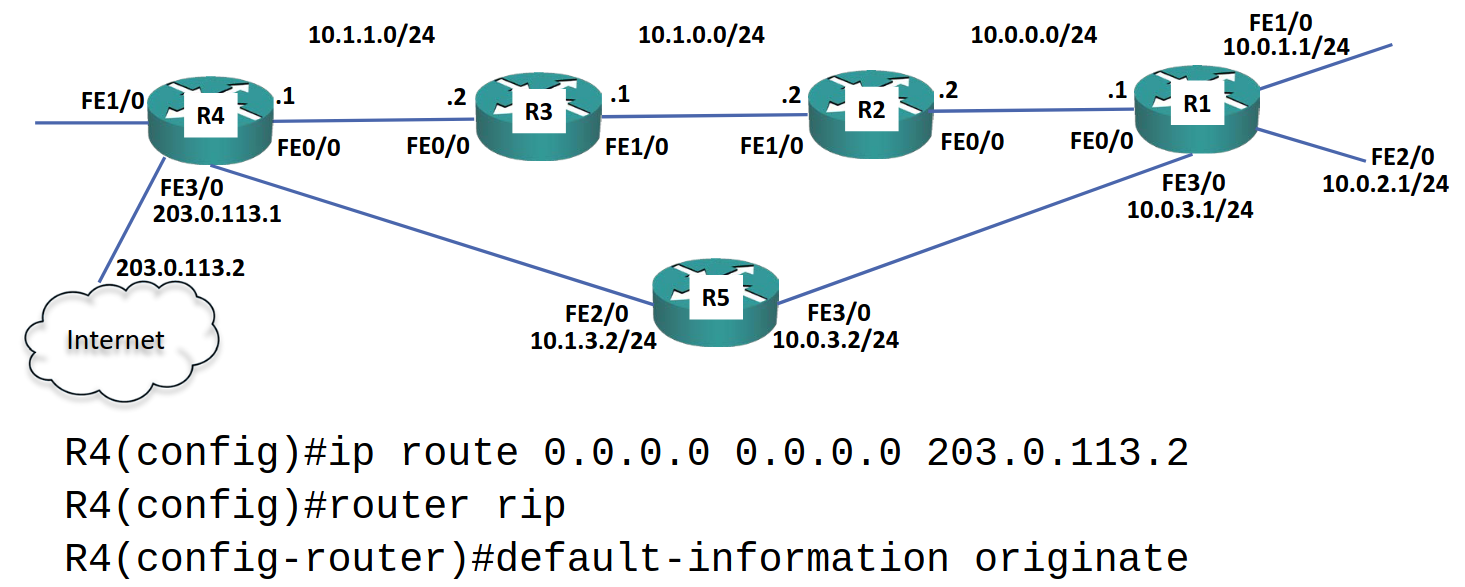
Default route injection
This is used when we have a static route going somewhere - for example the internet - but we do not want to configure that specific route on every single device. What we do is we access the final router that is connected to the internet and have it advertise that network to everyone else.
Suppose we have a router, R4 connected to the internet on FE3/0 and to internal networks on FE0/0. We use the command (from global config) ip route 0.0.0.0 0.0.0.0 <WAN IP address> (this is a default Static Routes). Once that is set, we want to inject the route into RIP by entering router ip and then default-information originate
Verification
To verify any routing protocol running on the router we can use show ip protocols from global exec mode. This will show us information for each protocol running in the device, as well as the specific data for that protocol and interface.
To see the running-configuration data, use sh run | section <protocol>, for example: sh run | section rip.
We can also look at the Routing Table by using show ip route
RIPv1 vs RIPv2
RIPv1 is a legacy protocol not typically used anymore, although still supported by Cisco. There are three primary differences between v1 and v2:
- In v1 Variable Length Subnet Masks (VLSM) is not available because it does not send subnet mask information with its routing updates
- v1 updates every 30 seconds using broadcast traffic, rather than the v2 Class D multicast address of
224.0.0.9 - v2 supports authentication, while v1 does not (in v2 this is done at the individual link level - links will not form IGP adjacencies unless both interfaces have the same password).
RIP Metric - Hop Count
RIP uses Hop Count as the metric to choose best paths. By default, the maximum hop count is 15; anything beyond 15 hops is marked as unreachable.
In the example below, R4>5>1 is preferred for 10.0.1.0/24:
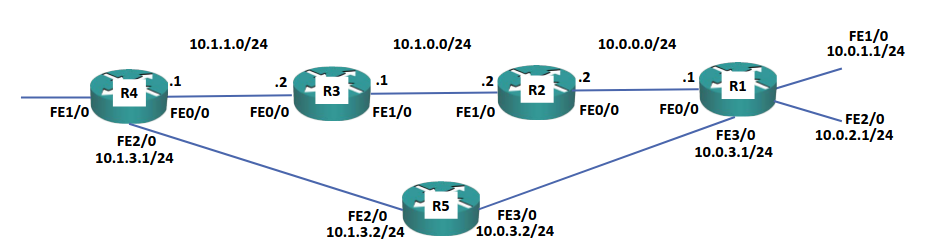
hop count as its cost function, the best path may not be the fastest path. For example, suppose that the straight line between R4 and R1 is all set to 100 Mbps, and that R5 operates at 10 Mbps. RIP will nonetheless choose the route via R5, because it does not take into account speeds.
Because RIP always uses
Why RIP?
Because rip uses naive Hop Count and has a maximum default metric of 15, it is not commonly used in production networks due to scalability limitations.